FindAGrave is one of the greatest free resources available online for genealogy research. Many people do not know:
- That you can format your memorials with bold and italics to organize them better.
- That you can link to OTHER memorials and Virtual Cemeteries in the FindAGrave memorial’s Biography section. (Note that you cannot create links to websites OUTSIDE FindAGrave in your memorial. The link will be automatically stripped.)
I’m going to show you how to do those 2 things, as well as provide some ideas for information that you can post on your memorial pages.
Using FindAGrave is a great way to share, freely and publicly, some of your research with the world. I like to include some standardized basics on my memorial pages, so I can both benefit myself (giving me a quick-reference, easy and quick-access place to store the basics on an individual), and benefit everyone else who may be researching the individual. Providing the basic information also helps people determine whether they are looking at the correct individual for their research.
Screenshot of some recommended formatting options:

Click here for a live link to the memorial shown above as a sample.
Here are some of my suggestions for information to include on your FindAGrave memorials:
- Birth (Date of birth, place of birth, source)
- Baptism (Date of baptism, place of baptism, source) (Or other major religious milestones, depending on the religion)
- Baptism Sponsors (Godparents)
- Marriage (Date of marriage, place of marriage, license number and name of government who issued the license, source)
- Marriage Witnesses
- Funeral, basic facts (Address if held at a house, date, name of the place of worship, and location of the place of worship)
- A listing of ALL individuals buried in the plot (or group of plots), with wording like “The following individuals are buried in this plot.” It also helps to add a note of either “complete listing” or “may be an incomplete list.” You can make it even more useful by adding the birth and death years after the name and hyperlinking to the memorials of those individuals.
- A TYPED copy of the death notice, the name of the newspaper, and the date of publication
- A picture of the death notice in the Photos section
- A note about their occupation may be appropriate, depending on the individual
- Add a special note if there is a cenotaph elsewhere for the individual, or if the grave was relocated (so that people do not create duplicate memorials for a previous burial or having the name on a headstone elsewhere). If there is a cenotaph in another cemetery or plot, or if the name is listed on a headstone elsewhere, create a page for that memorial and have the FindAGrave administrators mark the cenotaph as one (only an admin can mark a burial as a cenotaph). Cenotaph Information on FindAGrave

Other possible major life events or facts that you should consider include:
- Military service (War or period, exact years of service, branch of service, major medals/awards, etc.)
- If you are unable to link to FindAGrave memorial for family members like parents or siblings, because their place of burial is not known, you can add information on their family and links to the known memorials in the Biography section.
- Immigration information (origin place, destination place including city of arrival, names of other immigrants in the family, links to the memorials of the other immigrants, etc.)
- Other major life events such as migration within a country or participation in historical events
- List civilian honors and awards
- Political offices held (local, state, national offices)
- If the story of the death is significant historically or otherwise interesting, include some information on this. An example would be if the individual died while rescuing someone. Example:

Example of Biographical Information
This information explains the basics of this confusing family because they have many deaths within short periods, news stories about them, and multiple children with the same name (a child named for a previous one who died). It makes it easier to wrap your mind around their story and provides context to the glaring fact that they died in groups, and those years stand out in the list of children.

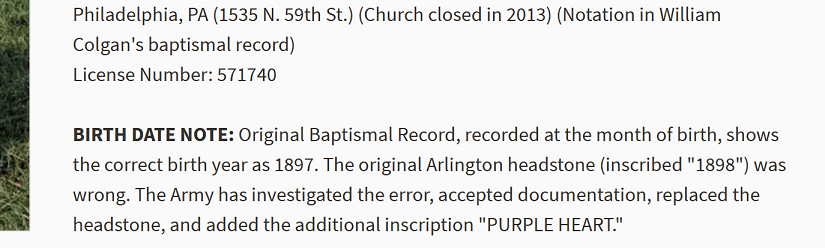
Examples of Adding Notes to Correct Errors
Example 1:

Example 2:
How to Code Bold, Italics, and Hyperlinks on FindAGrave
For BOLD, enclose the text you would like to be bold within an HTML BOLD tag set (<b></b>), like so:
<b>SAMPLE TEXT</b>
For ITALICS, enclose the text you would like to be bold within an HTML ITALICS tag set (<i></i>), like so:
<i>SAMPLE TEXT</i>
The most common use of italics in genealogy is for Maiden Names, but the formatting can also be used for various kinds of emphasis on your memorial’s page.
For BOLD and ITALICS together, simply add both tag sets together:
<b><i>SAMPLE TEXT</i></b>
Remember that your text MUST be contained WITHIN an opening AND a closing tag (the closing tag is the one with the forward-slash).
To create a HYPERLINK to another Memorial page, you must use an HTML tag for links. Links also have an opening and a closing tag that goes on either side of the text you wish to be linked. Note that ONLY links to other FindAGrave pages will work. Others pointed elsewhere on the internet will be stripped.
<a href=”http://www.findagrave.com/memorial/SAMPLE/”>SAMPLE TEXT TO BE LINKED</a>
To create your link, replace the word “SAMPLE” (BUT DON’T REMOVE THE QUOTES!) with the memorial ID number. You don’t need to include the name in the full hyperlink. You can add bold, italics, or both to your links by adding those tags above around your link code:
<b><i><a href=”http://www.findagrave.com/memorial/SAMPLE”>SAMPLE TEXT TO BE LINKED</a></i></b>
Everything WITHIN the opening (<a href=””>) and closing (</a>) tags of the link will be the link’s text. It can be anything you like.
Example of linking the names of individuals listed in a death notice to their memorial pages:

To create a HYPERLINK to a Virtual Cemetery, you use the same code except that the web address includes the following text: “/virtual-cemetery/SAMPLE-NUMBER”. Replace the SAMPLE with the virtual cemetery number (available in the web address, in your browser’s address bar).
<a href=”http://www.findagrave.com/memorial/virtual-cemetery/SAMPLE”>SAMPLE TEXT TO BE LINKED TO A VIRTUAL CEMETERY</a>
To create a HORIZONTAL LINE, the HTML code is not recognized, so you can create one using the underscore character (“_”), creating a line like this to divide information or sections:
____________________________________
To create a BULLET for a list, since the HTML codes for Unordered Lists are unavailable, you can simply copy and paste the Unicode Character • (U+2022) and put it to the left of the line you’d like to appear as a list:
• List item 1
• List item 2
• List item 3
You can copy and paste it from here, and I recommend saving the character in a plain TXT document to reuse whenever you need it. These bullets are great for creating a list of EVERYONE buried in the plot. Since it’s not a true bullet point list, you can also use the bullet in-line to separate text like this: Item1 • Item2 • Item3 • Item4 • Item5, which allows for easier scanning and reduced density of text.
Sample bullet list, created with the unicode bullet, copied and pasted into the page:

What’s NOT available?
- You can’t center text
- You can’t underline text
- You can’t indent or use multiple spaces in a row
- You can’t use HTML ordered (numbered/lettered) or unordered (bullet point) lists using the HTML code for those features
- You can’t change colors or the size of text
- You can’t use Headers
🥷